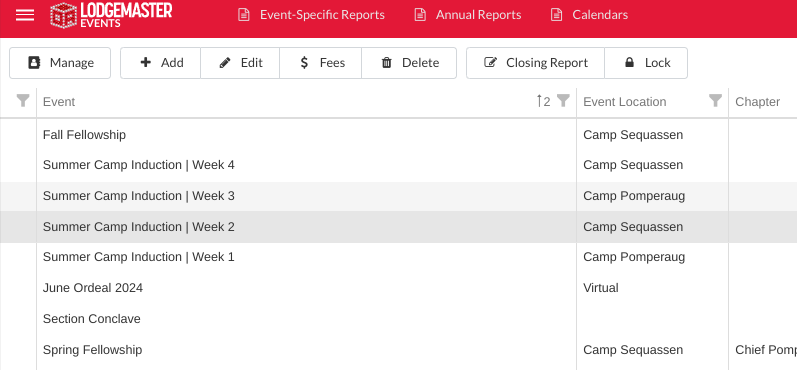
From the Event Grid select the event you want to manage and select the  button. button.
Then once you have selected manage you will be able to view the event roster, hover over "Wizards" 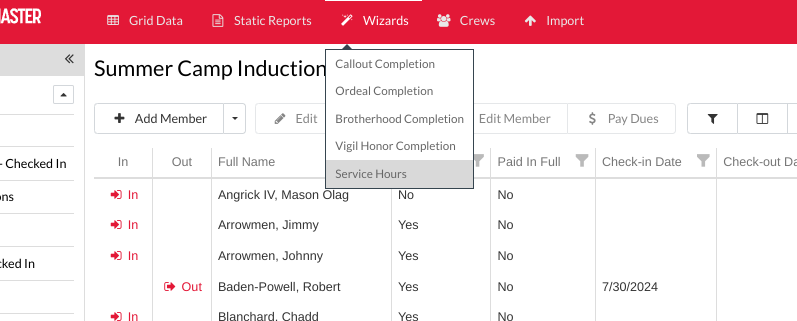
There are five different wizard options: - Callout Completion
- Ordeal Completion
- Brotherhood Completion
- Vigil Honor Completion
- Service Hours
Callout CompletionSelect "Callout Completion" Step 1 - Select whether or not to include checked in candidates
- The number of records on a page can be updated by selecting from the following options
- 100
- 250
- 500
- 1000
- Once you have selected all of the candidates select "Next"
Note: You have to select at least ONE candidate in order to continue 
Step 2 - Insert the Callout Date **
- Once completed select "Next"
** REQUIRED fields will be Callout Date. 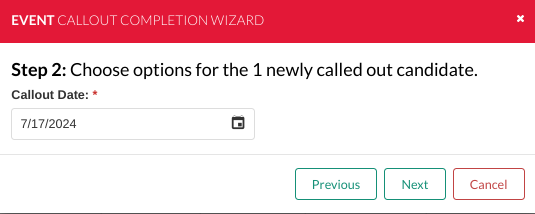
Once selected you will be presented with a confirmation screen. Please note: this action is irreversible, it CANNOT be undone. If you wish to continue select "Ok" 
Step 3 - Select Export Format
- Print
- Excel Workbook
- Excel 97-2003 Workbook
- CSV
- Select Line One Text
- None
- Dues Year
- Chapter
- Unit
- Selection Sort Order
- Name
- Dues Year
- Chapter
- Unit
- Zip Code
- Confirm whether or not you want one label per address
- Confirm whether or not you want to include bad addresses
- Select Export type
- Print / Export Labels
- Bulk Mail Report

Ordeal CompletionSelect "Ordeal Completion" Step 1 - Select whether or not to include checked in candidates
- The number of records on a page can be updated by selecting from the following options
- 100
- 250
- 500
- 1000
- Once you have selected all of the candidates select "Next"
Note: You have to select at least ONE candidate in order to continue 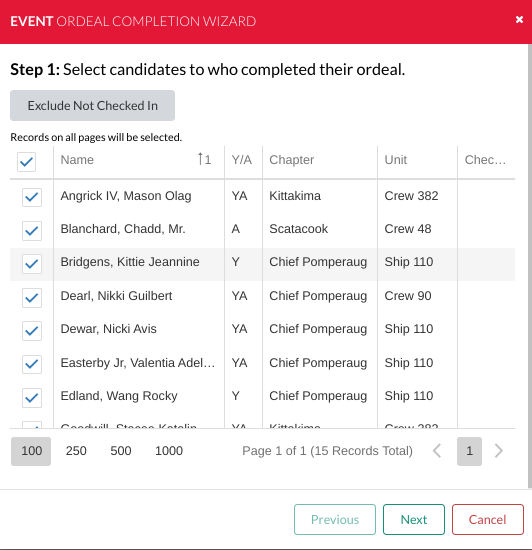 Image Added Image Added
Step 2 - Insert the Ordeal Date **
- Complete Dues Information
- Payment Method
- Receipt Number
- Payment of current year & amount
- Payment of next year & amount
- Complete Service Hours info
- Select whether or not to include service
- Service Date **
- Service Hours **
- Service Description
- Once completed select "Next"
** REQUIRED fields will be Ordeal Date, Service Date, and Service Hours. 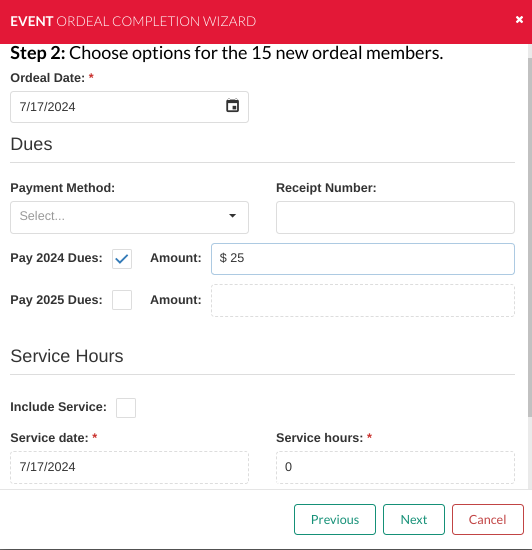 Image Added Image Added
Once selected you will be presented with a confirmation screen. Please note: this action is irreversible, it CANNOT be undone. If you wish to continue select "Ok"  Image Added Image Added
Step 3 Membership cards - Select Card Type **
- 2018/2021 Printing
- 2013 Printing
- Sort Order **
- Last Name
- Chapter
- Unit
- Zip Code
- Skip Cards **
- Card Front
- Name Format
- First Name
- Nickname
- Select whether to include Chapter Name and/or Unit
- Secretary's Name **
- Card Back (Note: Only for the 2018/2021 card printing)
- Top Field
- None
- Annual Pass
- Scouting Member ID
- Chapter
- Level Dates
- Unit
- Custom Text
- Top Custom Text
- Bottom Field
- None
- Annual Pass
- Scouting Member ID
- Chapter
- Level Dates
- Unit
- Custom Text
- Bottom Custom Text
- Bar Code
- None
- Scouting Member ID
- Select Printing Option
- Card Front
- Card Back
- Once done select "Next"
** REQUIRED fields will be Card Type, Sort Order, Skip Cards, and Secretary's Name.  Image Added Image Added
Step 4 - Select Export Format
- Print
- Excel Workbook
- Excel 97-2003 Workbook
- CSV
- Select Line One Text
- None
- Dues Year
- Chapter
- Unit
- Selection Sort Order
- Name
- Dues Year
- Chapter
- Unit
- Zip Code
- Confirm whether or not you want one label per address
- Confirm whether or not you want to include bad addresses
- Select Export type
- Print / Export Labels
- Bulk Mail Report
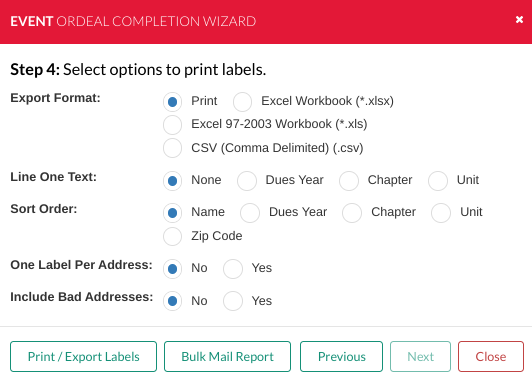 Image Added Image Added
Brotherhood CompletionSelect "Brotherhood Completion" Step 1 - Select whether or not to include checked in members
- The number of records on a page can be updated by selecting from the following options
- 100
- 250
- 500
- 1000
- Once you have selected all of the members select "Next"
Note: You have to select at least ONE member in order to continue  Image Added Image Added
Step 2 - Insert the Brotherhood Date **
- Complete Service Hours info
- Select whether or not to include service
- Service Date **
- Service Hours **
- Service Description
- Once completed select "Next"
** REQUIRED fields will be Brotherhood Date, Service Date, and Service Hours. 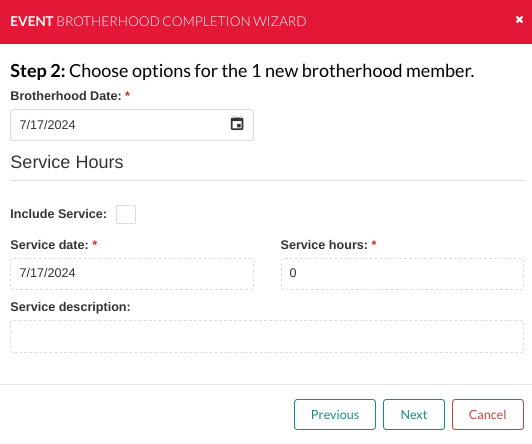 Image Added Image Added
Once selected you will be presented with a confirmation screen. Please note: this action is irreversible, it CANNOT be undone. If you wish to continue select "Ok"  Image Added Image Added
Step 3 Membership cards - Select Card Type **
- 2018/2021 Printing
- 2013 Printing
- Sort Order **
- Last Name
- Chapter
- Unit
- Zip Code
- Skip Cards **
- Card Front
- Name Format
- First Name
- Nickname
- Select whether to include Chapter Name and/or Unit
- Secretary's Name **
- Card Back (Note: Only for the 2018/2021 card printing)
- Top Field
- None
- Annual Pass
- Scouting Member ID
- Chapter
- Level Dates
- Unit
- Custom Text
- Top Custom Text
- Bottom Field
- None
- Annual Pass
- Scouting Member ID
- Chapter
- Level Dates
- Unit
- Custom Text
- Bottom Custom Text
- Bar Code
- None
- Scouting Member ID
- Select Printing Option
- Card Front
- Card Back
- Once done select "Next"
** REQUIRED fields will be Card Type, Sort Order, Skip Cards, and Secretary's Name. 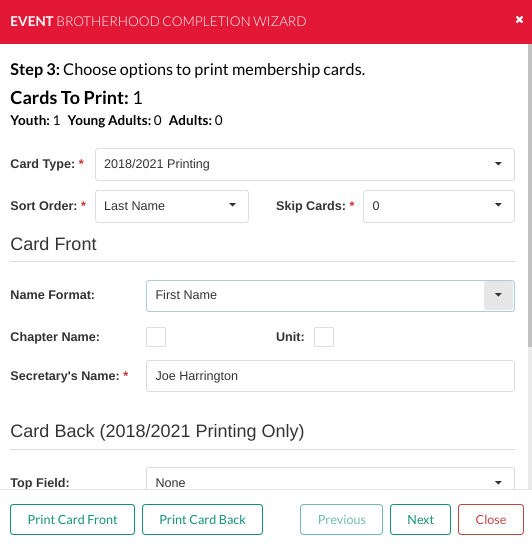 Image Added Image Added
Step 4 - Select Export Format
- Print
- Excel Workbook
- Excel 97-2003 Workbook
- CSV
- Select Line One Text
- None
- Dues Year
- Chapter
- Unit
- Selection Sort Order
- Name
- Dues Year
- Chapter
- Unit
- Zip Code
- Confirm whether or not you want one label per address
- Confirm whether or not you want to include bad addresses
- Select Export type
- Print / Export Labels
- Bulk Mail Report
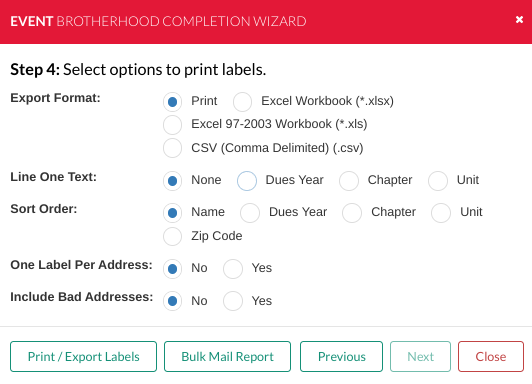 Image Added Image Added
Vigil Honor CompletionSelect "Vigil Honor Completion" Step 1 - Select whether or not to include checked in members
- The number of records on a page can be updated by selecting from the following options
- 100
- 250
- 500
- 1000
- Once you have selected all of the members select "Next"
Note: You have to select at least ONE member in order to continue 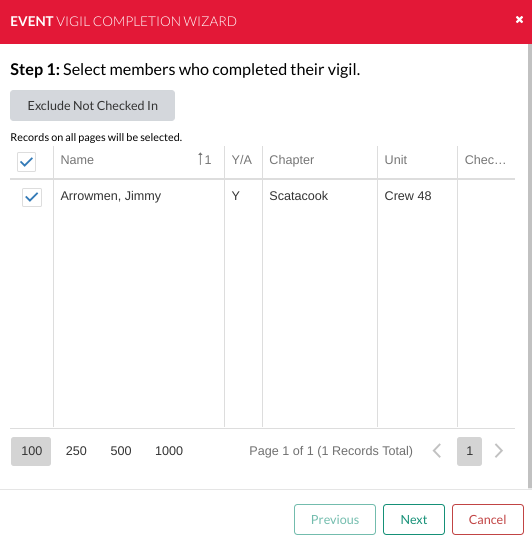 Image Added Image Added
Step 2 - Insert the Vigil Date **
- Complete Service Hours info
- Select whether or not to include service
- Service Date **
- Service Hours **
- Service Description
- Once completed select "Next"
** REQUIRED fields will be Vigil Date, Service Date, and Service Hours. 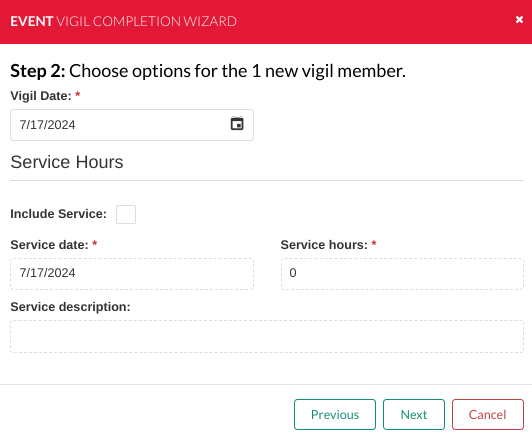 Image Added Image Added
Once selected you will be presented with a confirmation screen. Please note: this action is irreversible, it CANNOT be undone. If you wish to continue select "Ok"  Image Added Image Added
Step 3 Membership cards - Select Card Type **
- 2018/2021 Printing
- 2013 Printing
- Sort Order **
- Last Name
- Chapter
- Unit
- Zip Code
- Skip Cards **
- Card Front
- Name Format
- First Name
- Nickname
- Select whether to include Chapter Name and/or Unit
- Secretary's Name **
- Card Back (Note: Only for the 2018/2021 card printing)
- Top Field
- None
- Annual Pass
- Scouting Member ID
- Chapter
- Level Dates
- Unit
- Custom Text
- Top Custom Text
- Bottom Field
- None
- Annual Pass
- Scouting Member ID
- Chapter
- Level Dates
- Unit
- Custom Text
- Bottom Custom Text
- Bar Code
- None
- Scouting Member ID
- Select Printing Option
- Card Front
- Card Back
- Once done select "Next"
** REQUIRED fields will be Card Type, Sort Order, Skip Cards, and Secretary's Name. 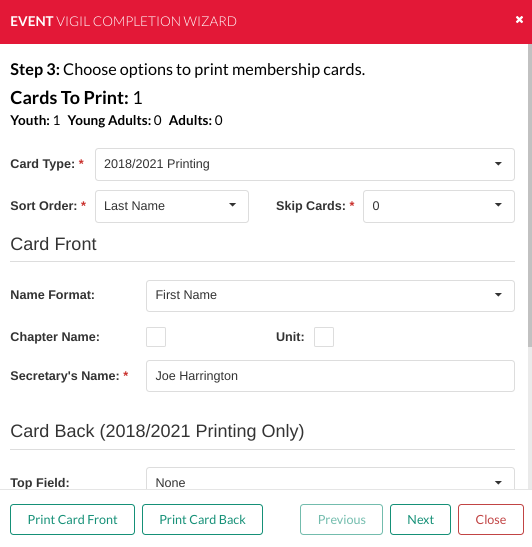 Image Added Image Added
Step 4 - Select Export Format
- Print
- Excel Workbook
- Excel 97-2003 Workbook
- CSV
- Select Line One Text
- None
- Dues Year
- Chapter
- Unit
- Selection Sort Order
- Name
- Dues Year
- Chapter
- Unit
- Zip Code
- Confirm whether or not you want one label per address
- Confirm whether or not you want to include bad addresses
- Select Export type
- Print / Export Labels
- Bulk Mail Report
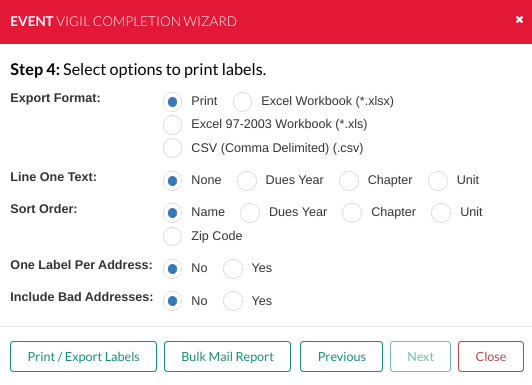 Image Added Image Added
Service HoursSelect "Service Hours" Step 1 - Select whether or not to include checked in members
- The number of records on a page can be updated by selecting from the following options
- 100
- 250
- 500
- 1000
- Once you have selected all of the members select "Next"
Note: You have to select at least ONE member in order to continue 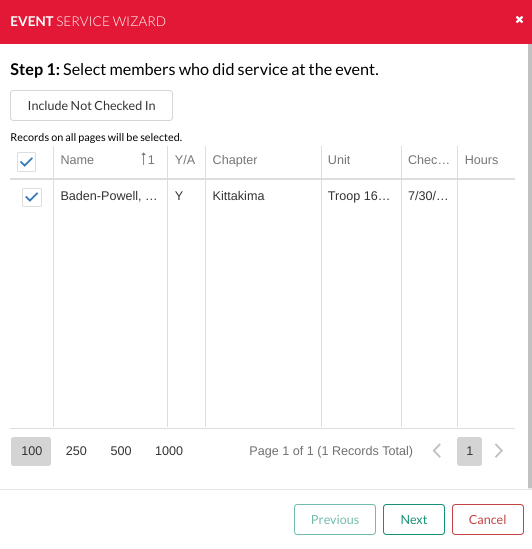 Image Added Image Added
Step 2 - Complete Service Hours info
- Service Date **
- Service Hours **
- Service Description
- Once completed select "Next"
** REQUIRED fields will be Service Date, and Service Hours. 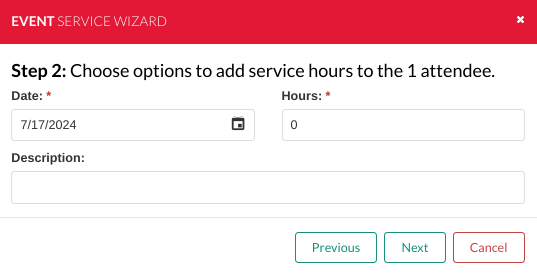 Image Added Image Added
Once selected you will be presented with a confirmation screen. Please note: this action is irreversible, it CANNOT be undone. If you wish to continue select "Ok" 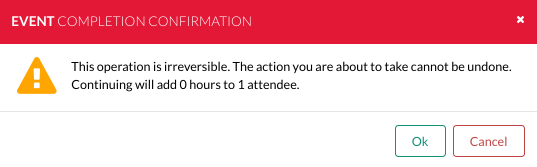 Image Added Image Added
| 


